Today we have Janneke from Jip by Jan showing us how to make the cutest bicycle basket bag. This lovely little accessory can add a pop of color to your bike, and is also extremely easy to clean (just in case the wine spills on your bike ride). Do you ride a bike pretty often? If not, after this tutorial you might just want to. I’d love to make one out of red and white gingham that could also double as a picnic bag.
You can learn more about Janneke here and make sure to take a peek at her quick and easy half-a-day tutorials.

Check out the complete DIY Bicycle Basket tutorial in English and Dutch after the jump…

Nu ik nog een tas voor mijn fietsmand maakte, heb ik ook foto’s gemaakt, zodat ik er een tutorial bij kon schrijven. Heb jij ook zo’n handige mand of krat op je fiets waar je alle losse boodschappen in vervoert? Met deze handige tas draag je ze, eenmaal thuis, in een keer naar binnen. En hij staat ook nog eens leuk tijdens het boodschappen doen 😉
I made a second bag for my bicycle basket and while doing that I took several pictures, so I could write a tutorial. Do yo have a wicker basket or crate on your bicycle where you put all your groceries? With this practical bag you can carry them, once home, inside your house in one trip. And it looks nice while shopping 😉
Het is een eenvoudige tas om te maken, ook zeker geschikt voor beginnende naaisters. Laat je niet afschrikken door de hoeveelheid foto’s, ik heb er extra veel gemaakt voor de duidelijkheid. Het is dus geen indicatie van de moeilijkheidsgraad. Je maakt de tas in ongeveer 2 uur, een perfect O.M.A.-project dus!
It’s an easy bag to sew so it’s absolutely doable for beginning sewers. Don’t let the number of pictures scare you in any way. I took many pictures just for clarification. As a picture tells so much more than words. So the number of pictures is in no way an indication of the degree of difficulty. You’ll need approximately 2 hours to make the bag, a perfect O.M.A.-project!

Stap 1: de benodigdheden en afmetingen
- Zeil voor de binnenkant
- Stof voor de buitenkant
- Tassenband
- Biaisband
- Sluiting (ik gebruikte drukknopen en keperband, maar je kan ook een knoop en een lusje aanzetten, zoals ik bij de vorige tas deed)
- Eventueel versiersels als bandjes, lintjes, een labeltje
Knip op maat: Meet je mand op aan de binnenkant. Bij mij zijn de maten als volgt: breedte = 40 cm, diepte = 26 cm en hoogte = 24 cm. Heb je dezelfde maten, dan kun je mijn afmetingen aanhouden, anders moet je de afmetingen aanpassen aan de hand van de formule.
B = breedte, D = diepte, H = hoogte en NT = naadtoeslag (wat je zelf fijn vindt, 1 cm of 0,5 cm bijvoorbeeld)
Zeil: 74 bij 67 cm (D + 2 x H bij B + D + 2 x NT)
Stof: 75 bij 67 cm (D + 2 x H + 2 x NT bij B + D + 2 x NT
Tassenband: twee stukken van 63 cm
Biaisband: 152 cm (2 x B + 2 x D + 20 cm)
Step 1: Materials and dimensions
- Oilcloth for the inner bag
- Fabric for the outer bag
- Straps
- Bias tape
- Closure (I used press fasteners and twill tape, but you can also sew on a button like I did with the first bag)
- Optional/embellishment: ribbon, label, twill tape
Cut to size: Measure the inside of your basket. My basket’s measurements are: width = 40 cm, depth = 26 cm and height = 24 cm. Does your basket have the same dimensions? Then you can use my measurements to cut the oilcloth and fabric. Otherwise, use the formula below to get yours.
W = width, D = depth, H = height and SA = seamallowance (I use 0,5 cm)
Oilcloth: 74 by 67 cm (D + 2 x H by W + D + 2 x SA)
Fabric: 75 by 67 cm (D + 2 x H + 2 x SA by W + D + 2 x SA)
Straps: two pieces of 63 cm Bias tape: 152 cm (2 x W + 2 x D + 20 cm)
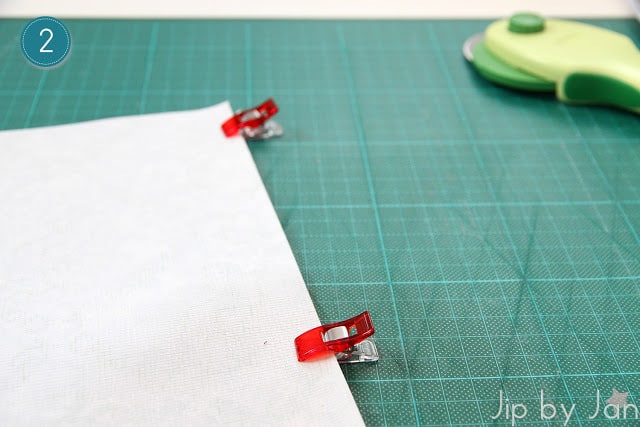
Stap 2: vouw het zeil van de binnentas met de goede kanten op elkaar om de zijnaad te naaien.
Step 2: Fold the oilcloth in half, right sides facing and stitch along the two sides.
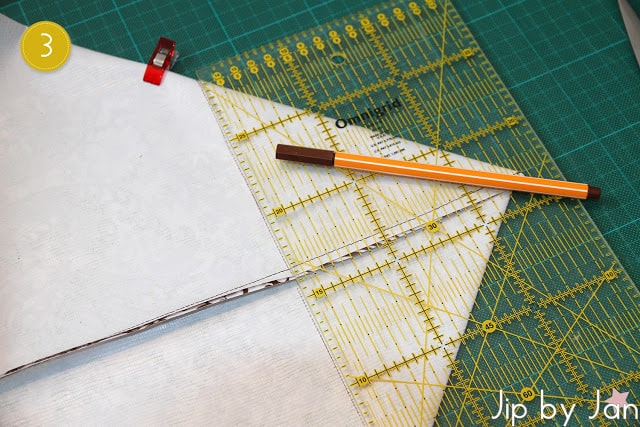
Stap 3: vouw de zijnaad opzij, recht op de vouw en teken een driehoek af. De lijn die ik hierboven tekende langs mijn liniaal is 26 cm, de afmeting van de diepte van de tas. Die lijn teken je op 13 cm vanaf de punt (0,5 x D). Met een geodriehoek of liniaal zoals je hierboven ziet, is dat het best te doen.
Naai langs de getrokken streep en doe hetzelfde aan de andere kant van de tas. Check ook deze naaitip van Craft Apple.
Step 3: box the corners by laying down the side seam down the center of the bag. Lay your ruler on the seam and draw a line at 13 cm (0,5 x D) from the pointy end. If you do it right, the line you’ve drawn should be 26 cm, which is the depth of you bag.
Sew along the line and box the corner at the other side of the bag too. This sewing tip of Craft apple can be helpful.
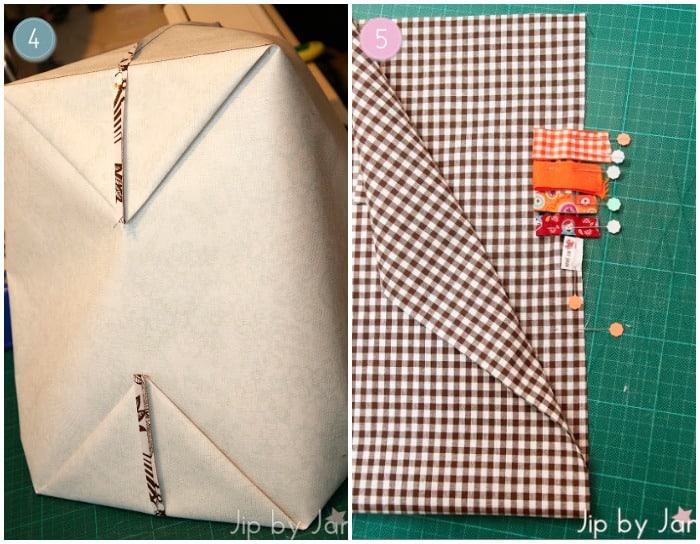
Stap 4: Voor de stevigheid van de tas, kun je de driehoeken naar de onderkant van de tas vouwen en vastzetten met lijm. Je kunt ze ook afknippen. Je binnentas is nu klaar.
Step 4: For sturdiness you can fold the flaps down and glue them to the bottom of your bag. Or you can trim them. Your inner bag is done now.
Stap 5: De buitentas. Als je versieringen wilt toevoegen, speld je de lintjes langs de lange kant. Houd rekening met de driehoek die je straks nog af moet tekenen, dus leg je labeltjes minimaal 13 cm (maar liefst verder) vanaf de vouw.
Step 5: The outer bag. If you want to embellish the bag, pin ribbon and/or labels along the edge. Keep in mind that you have to box the corners, so put them at least 13 cm above the fold.
Stap 6: Zet je labeltje vast. Deze stap kun je ook overslaan, als je de labeltjes tegelijk vast wilt zetten met het stikken van de zijnaad, maar ik vind het prettiger om dat eerst te doen, dan weet ik zeker dat er niets verschuift.
Step 6: Stitch the ribbons. You can skip this step, if you want to attach them by stitching the side seam. I like to stitch them before sewing the side seam, to be sure nothing shifts.
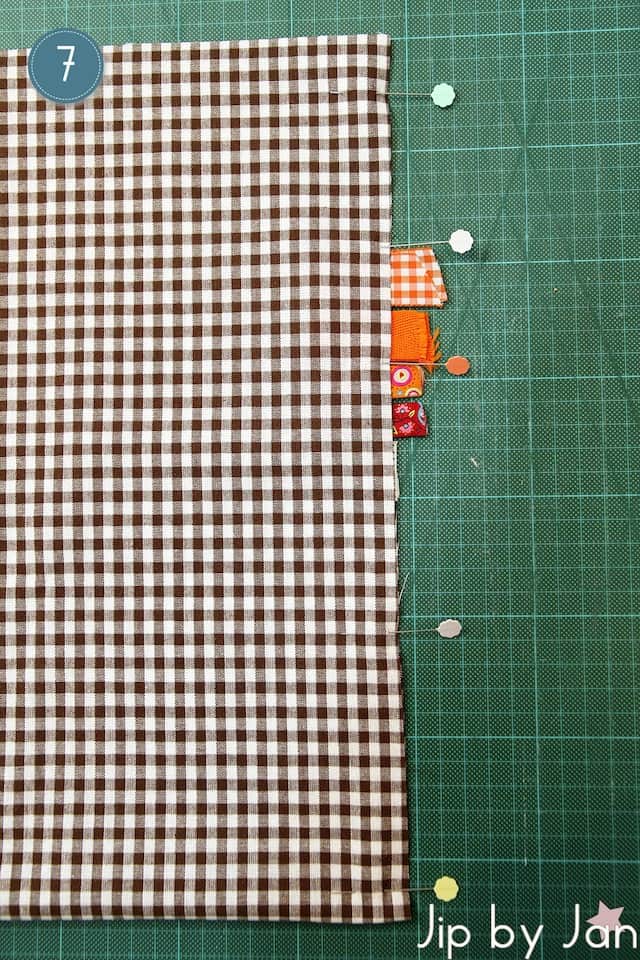
Stap 7: speld de zijnaad vast (goede kanten op elkaar) en stik.
Step 7: Pin the side seam together (right sides facing) en stitch.
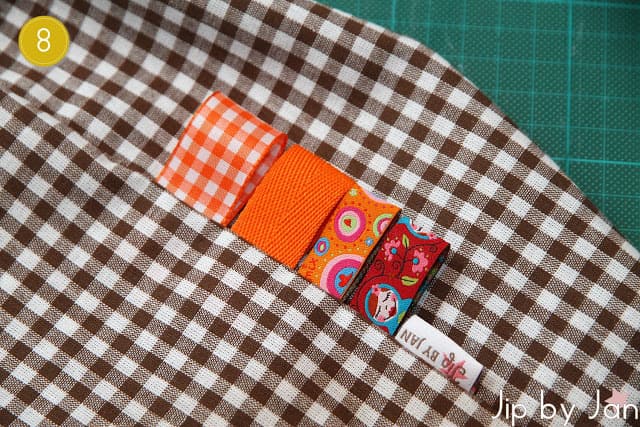
Stap 8: controleer of je labeltjes mooi vastzitten (met name als je stap 6 over hebt geslagen) Step 8: check whether your ribbons are attached properly (especially if you skipped step 6)

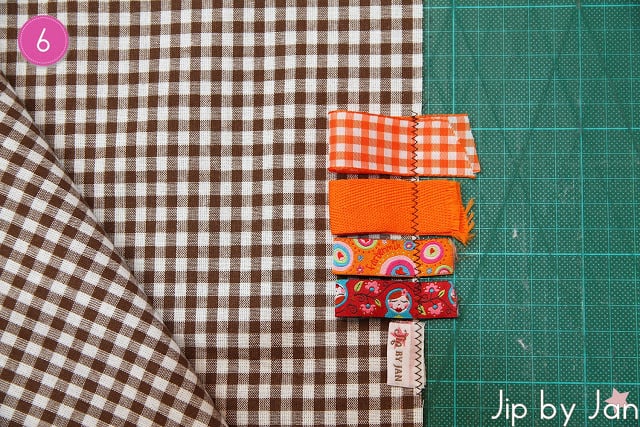
Stap 9: herhaal stappen 3 en 4. Bij het zeil kon je de onderste vouw goed zichtbaar maken door een scherpe vouw in het zeil te drukken, bij stof gaat dat lastiger. Ik schuif dan even een speld door de vouw vanaf de onderkant, zodat als ik mijn zijnaad over de stofvouw wil leggen, ik zie waar ik zijn moet. Hierboven zie je het speldje en rechts is de zijnaad die ik naar binnen heb gevouwen.
Step 9: repeat steps 3 and 4. With the oilcloth you could see the center fold where you had to line the side seam to easily, if you pressed the fold. With fabric, that’s a lot harder. I use a pin to mark that center fold, so when I lay my side seam down, I can see where it has to go. In the picture above you see my pin and on the right of the pin you see the side seam, folded inwards.
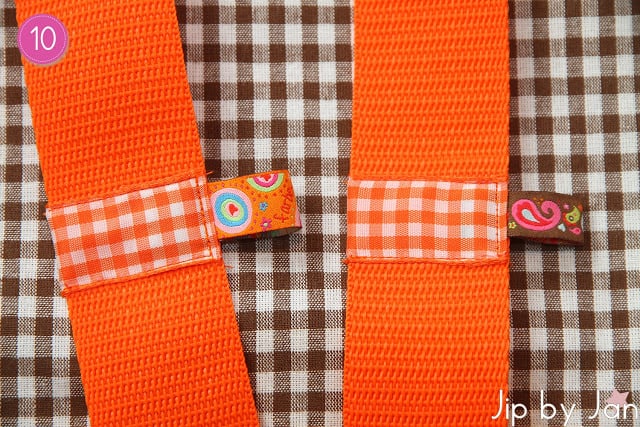
Stap 10: versier eventueel je tassenband. Ik deed dat als hierboven met lint, overdwars, maar je kan bijvoorbeeld ook lint over de volle lengte van het band naaien, zoals ik deed bij de luiertas.
Step 10: embellish your straps (optional). You can do it like this, or use ribbon along the full length, like I did with the diaperbag.
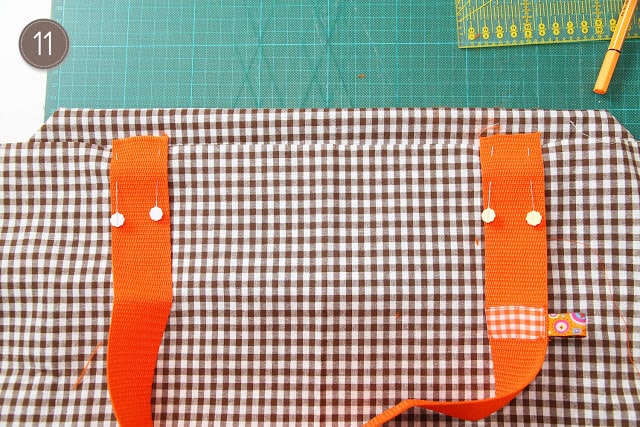
Stap 11: Zet het tassenband aan de goede kant van de buitentas vast. Meet vanuit het midden 11 cm naar links en 11 cm naar rechts. Zet op die plek de binnenkanten van het band.
Step 11: Pin your straps to the right side of the outer bag. Measure 11 cm from the center of the bag, that’s where you’ll put the insides of the straps.
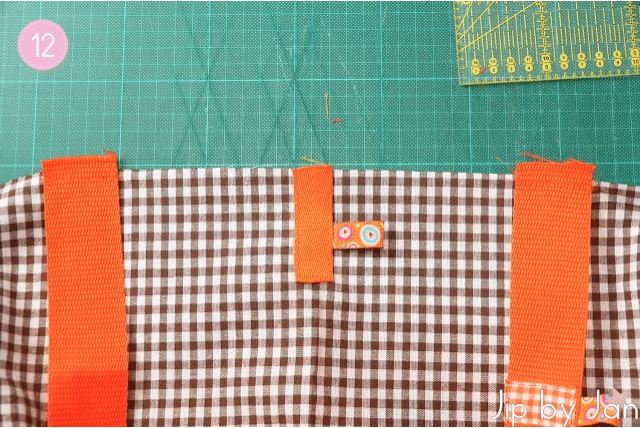
Stap 12: Ik zette dit keperband (met labeltje ter versiering) op het midden van de voorkant van de tas zodat ik daar mijn drukknoop op vast kan zetten. Voor extra stevigheid. Aan de achterkant van de tas naai je dan een stukje keperband voor de bovenkant van de drukknoop (zie foto stap 13). Deze stap is niet nodig als je gaat voor de optie met de knoop en het lusje.
Step 12: I used twill tape (with a little piece of ribbon for embellishing) and sewed it on the front of the bag, so I can put my push button on there. For sturdiness. Sew a piece of twill tape at the back of the bag for the upper piece of the push button (see the picture at step 13). You don’t need this step if you chose a different kind of closure.
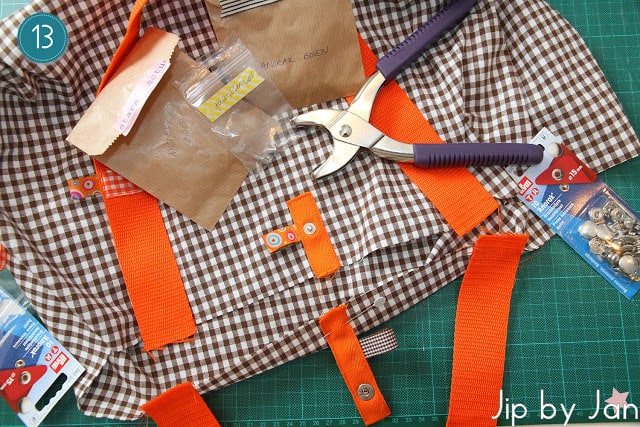
Stap 13: Zet de drukknoop aan, volgens de instructie op de verpakking.
Step 13: Attach the push button, by following the instruction on the package.
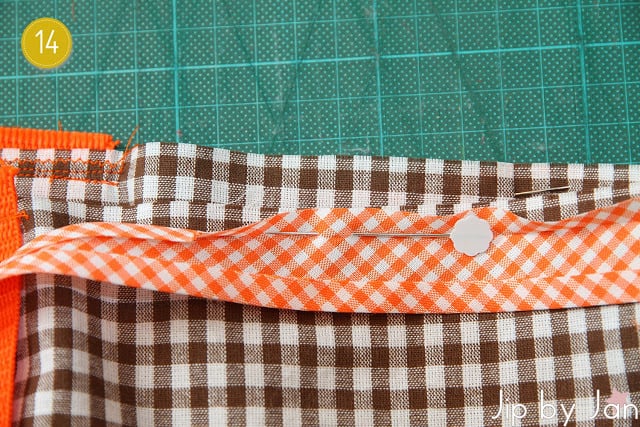
Stap 14: En dan nu het deel waar je waarschijnlijk naar hebt uitgekeken: het aanzetten van biaisband 😉 Ik weet dat velen gruwelen van het aanzetten van biaisband. Ik hoop je er met deze foto’s doorheen te loodsen. Als het niet duidelijk genoeg is, of wanneer je nog steeds nachtmerries krijgt, geef even een gil, dan probeer ik het te verduidelijken.
Begin aan de achterkant van de buitentas met het vastspelden van het biaisband, zodat je naad straks aan de achterkant valt. Laat de eerste 10 cm van het band ongebruikt. Leg het band met de goede kant op de goede kant van je tas en speld de rechterkant van het band langs de bovenrand van je tas. Speld rondom vast en stik. Stop ongeveer 10 cm voor het punt waar je begonnen bent.
Step 14: the step you’ve been waiting for: attaching the bias tape 😉 I know many of you hate this. I am hoping you’ll hate it a little less after seeing this pictures (or maybe even begin to love it?). If it’s not clear enough or you still wake up at night screaming, please leave a comment and I’ll try to explain better.
Pin the tape to your outer bag, right sides of the bias tape and bag facing. Start at the back of the bag and don’t use the first 10 cm of the tape. You’ll need that later to join the beginning and the end of your tape. Stitch along the fold and stop 10 cm before the point where you started.
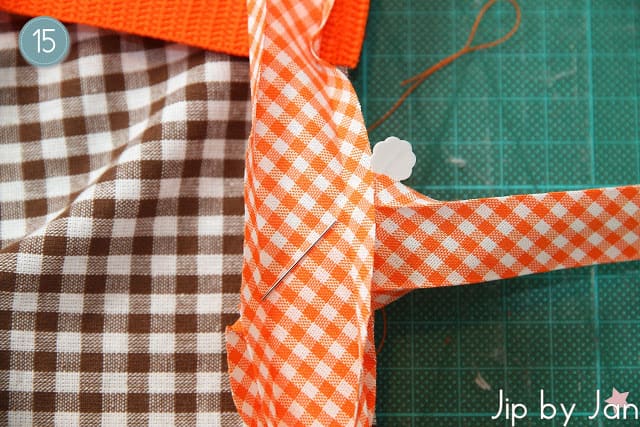
Stap 15: Vouw het begin van je biaisband naar rechts (zie foto boven) en vouw het einde van je biaisband naar links, zodat je een goede vouw ziet ontstaan. Over die vouwen zet je het biaisband op elkaar vast met een diagonale lijn (zie ook mijn Opbergmand tutorial voor nog meer detailfoto’s). Knip de overtollige delen band af.
Step 15: To join the beginning and the end of the tape, fold the beginning of your tape to the right and fold the end to the left, so you’ll get diagonal folds in your tape. Pin those folds together, right sides of the tape facing and stitch along that diagonal fold (see my Fabric basket tutorial for more detailed pictures). Trim.
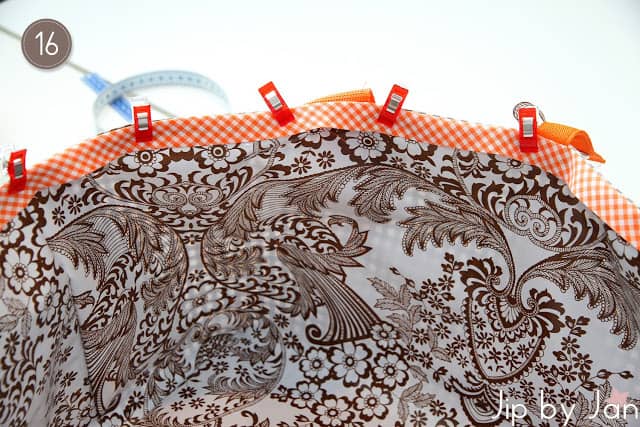
Stap 16: Zet de binnenmand in de buitenmand en vouw het biaisband om de bovenkant. De naad die je net gestikt hebt (tussen buitentas en biaisband) zit nu aan de bovenkant van de tas. Ik heb het biaisband niet dubbelgevouwen, maar de volledige breedte gelaten. Gewoon omdat ik die bredere rand mooier vond. Je kunt het band echter eventueel nog dubbelvouwen voor je het vast stikt. Ik gebruikte de Clover Wonderclips om het biaisband vast te zetten voor ik ging stikken, aangezien dat met spelden moeilijk gaat door zeil.
Step 16: Put the inner bag in the outerbag, wrong sides facing and fold the bias tape inwards, over the edge. The seam you’ve just stitched (between outer bag and bias tape) is now positioned on the top of your bag. I didn’t fold the biastape, but used the full width. Just because I liked it that way. But if you like it smaller, fold the tape in half before you stitch. I used Clover Wonder clips to position the tape before stitching, for you can’t do that with pins to oilcloth.
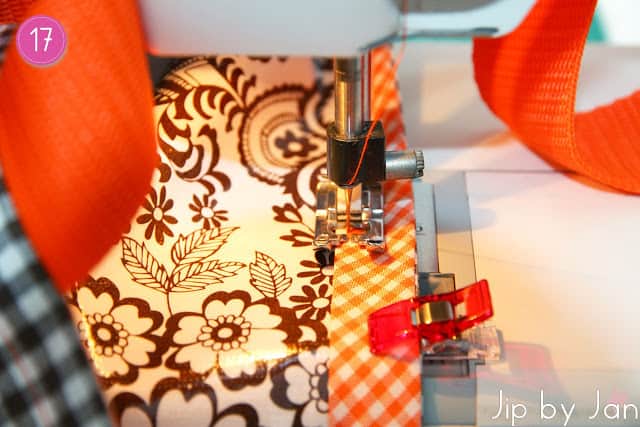
Stap 17: Stik het biaisband vast langs de onderste rand. Stik rondom en je tas voor in je fietsmand is klaar!
Step 17: Stitch the bias tape along the edge and you’re done! The bag for you bicycle basket is finished!
Veel plezier met het maken van de tas. Ik ben benieuwd naar je creatie! Geef een linkje naar je blogpost in een reactie hieronder of plaats een foto op mijn facebookpagina.
Have fun sewing this bag. I’m looking forward to seeing your creation! Please enter a link to your blogpost in a comment below or put a picture on my facebookpage.
Hartelijke groet,
Janneke Assink


[…] of mijn fietsmand-tas-tutorial gepost mocht worden op hun blog. Euhm… jaha! Afgelopen maandag was het dan zover. Onnodig te zeggen dat ik daar stiekem best een beetje trots op […]