


Before you say to yourself, I can’t do that, think again. Ally from Nail in the Coffee is here to share the super simple technique that has gorgeous results. I can’t believe it’s almost been a year since Ally shared her first nail tutorial on Pretty Prudent – Springing into Summer.
Be inspired to get creative with your nails by heading on over to Nail in the Coffee to see the pretty nail art Ally has been whipping up, like her recent Inspired by Labradorite nails. You can also follow her on Instagram @NailintheCoffee and on Twitter.
Take it away Ally…
Lighten Up, It’s Spring! Gradient Nail Tutorial
It’s finally spring, and I’m excited to teach you this amazing technique. It’s SO easy, and looks SO fantastic: GRADIENT NAILS!
I’m going to suggest you prep and prime your nails, according to my Basics guide, especially your work area – you’ll be needing that wax paper!
For this tutorial I’m going to use two gorgeous colors from butterLONDON’s Boho Rock Collection that look like they’re lightening from one to the other: Trifle, a wine colored polish with a gold shimmer; and butter LONDON Nail Lacquer, Goss, a metallic polish like liquid rose gold!
Other things you’ll need: a toothpick and a cosmetic sponge.
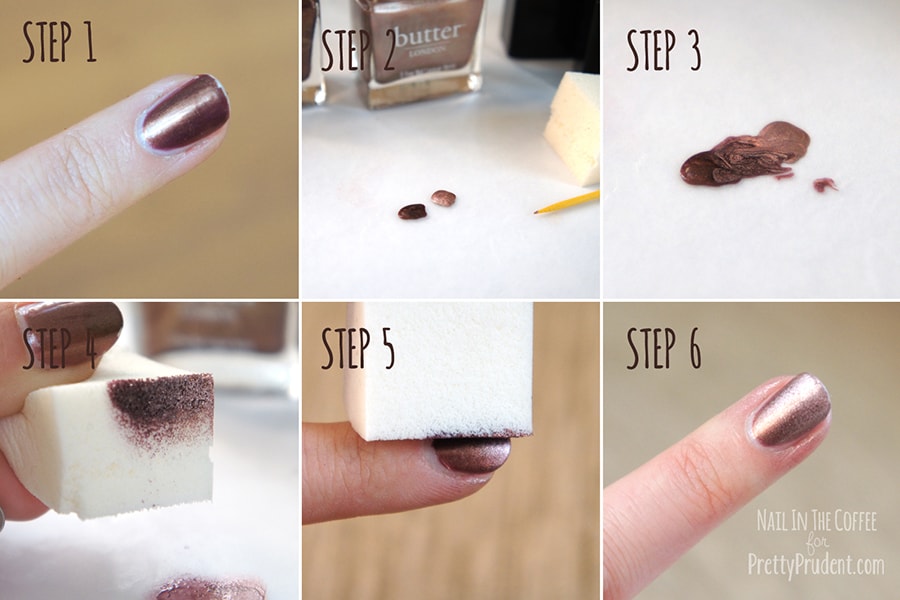
Step 1. Paint your nails using Trifle as the base color.
Expert Tip: This is a great “refresher” manicure – after you wear a plain mani and the color starts to wear at the tips. Turn it into a gradient nail and you’ve just extended your manicure’s life by a few days!
Step 2. On a piece of wax paper, put a drop of each, of Trifle and Goss next to each other.
Step 3. Using a toothpick, swirl the two polishes together, so the color fades from one to the other.
Step 4. Take your cosmetic sponge and dip it into the nail polish gradient you’ve just created.
Step 5. Dab the sponge along your nail, with Goss at the tips of your nails, and the bottom fading into your base color of Trifle. Repeat for each nail. You’ll probably need to do a few more drops of nail polish to get them all done.
Expert Tip: If your gradient doesn’t come out as gradual as you’d like, you can dab back and forth – further up, then further down your nail – to make the transition smoother.
Step 6. Swipe a Q-tip or brush dipped in remover around your nails to easily remove any polish that may have landed around your nails, during the sponging process.
I love gradient nails so much. You can do it with any colors you like, and artistic skills aren’t required for this technique – just drop, mix and dab!
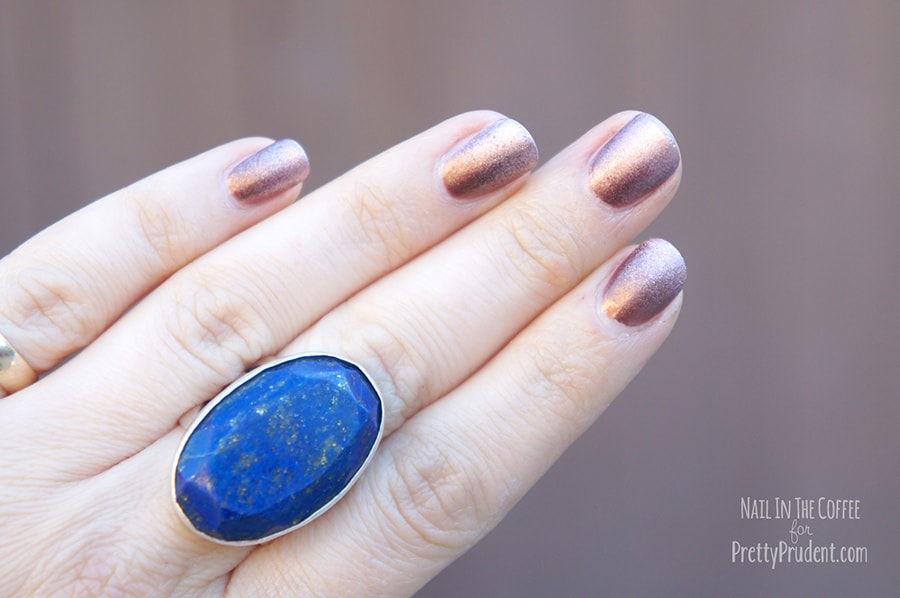
EXTRA: What’s the difference between Gradient and Ombré nails, you ask? Ombré nails are where each nail is a different color, fading across the fingers. Gradient Nails have the fade effect on each nail!
Get sponging and try this ladies, I know you’ll love it.
Till soon,
[…] Source: prudentbaby.com […]
[…] 8. Pink and Gold Fan Nails 9. Glittery Gradient Nail Tutorial […]
[…] 出典:www.prettyprudent.com […]
[…] Image credit: Pretty Prudent […]
I can’t stand having gross, crusty nails. But sometimes you just wanna switch up your look, especially during the summer. Thankfully, I stumbled upon this super easy tutorial right when I needed it most. With my work schedule, I hardly have time to hit the salon anymore. This tutorial is a total godsend!