


Ally from Nail in the Coffee has a tutorial for you today with a little extra sass. She likes to call these her ‘Peg Bundy’ nails, and I think that pretty much sums it up. You will need three colors to do this, plus a matte top coat. You can check out what the matte finish looks like over black in her Dipped and Tipped nails. So stunning! I’m also crushing on her Tan Lines Nails and Lucky to Bedazzled Nails for summer.
Once you’ve conquered leopard print, check out her 4th of July Firework Fingertip Nails Tutorial and her Red, White, and Blue Nautical Nails Tutorial.
Let’s get started with the Leopard Print Nail Tutorial after the jump…
Leopard Print Nail Tutorial
I’m happy to say that I’ve finally done a tutorial for one of the (in my opinion) BEST, and deceivingly simple, nail art designs ever: LEOPARD!
Calm yourself ladies, I swear it REALLY IS simple, and you’re guaranteed to get attention with them. You can do it in any three colors that you like, but I think this combo is bright and perfect for summer!
As always, prep and prime your nails according to my Basics guide. In addition, you will need three things besides the polishes and your fingers:
-Tin foil, or wax paper, to use as a nail polish palette.
-The small end of a dotting tool – not to worry if you don’t have a dotting tool, simply use the end of a bobby pin, or a toothpick with a blunted end.
-A matte topcoat, like I use here.

Step 1. Paint all your nails with the base color. This will be background of the leopard pattern. Often this is the lightest of the colors, but I’ve seen every combination possible. Let your imagination be your guide! I used a sheer orange with gold flakies.
Step 2. Place a drop of polish on the tin foil. This should be the color that you want the inside of the leopard dots to be. I used a bright, summery tomato red.
Step 3. Using the dotting tool, dip it into the drop of polish, and then dot on irregularly shaped dots on your nail – lean more towards splotches. Do about 3-7,depending on the nail size, and leave ample room between them. Don’t try to make them perfect or uniform shapes – the more irregular, the better. Make one small perhaps, and one longer, etc. Re-dip your dotting tool as needed.
Step 4. Place a drop of the last polish on the tin foil, here I used a dark slate grey. Dip the small side of your dotting tool (you’ll probably want to have wiped off the other color). This will be the outlines of the leopard dots.
Step 5. With your dotting tool, start to trace disconnected borders around each red dot. Using a daubing motion gives it the thicker and thinner shape. Don’t worry about them being perfect, trust me – it looks better when it’s not! I like do to most with two or three pieces around them. It’s way easier than it looks – the moment you start you’ll see what I mean!
Step 6. Fill in any last blank “holes,” or areas that need a “little something” with a dot.
Step 7. I finished with a matte topcoat, to tone down the bright snazzy-ness of this. The manicure already had bright red and gold – the shine was too much! Mattified made it just PERFECT. I painting the rest of my nails the same bright red, mattified, with the two accent nails.
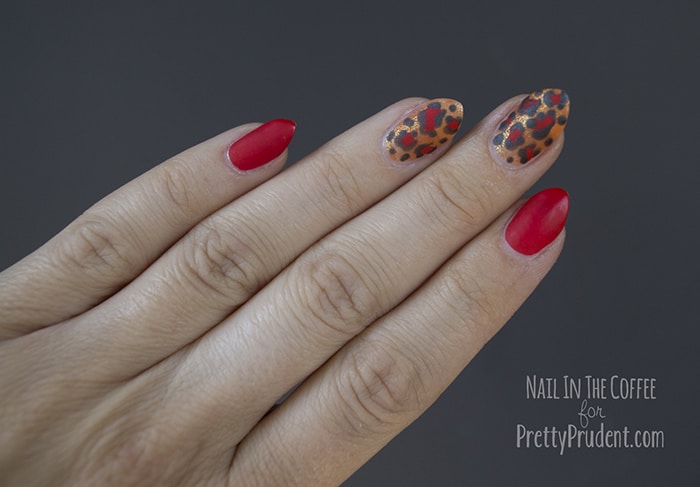
I called these my “Peg Bundy” nails – something about these just really said big hair and lots of talk, right? I absolutely loved them though, and I got a great response from people over them – I kept telling them how easy it was and to look out for the tutorial! I hope you all give it a try!
Here are the nail polishes I used:
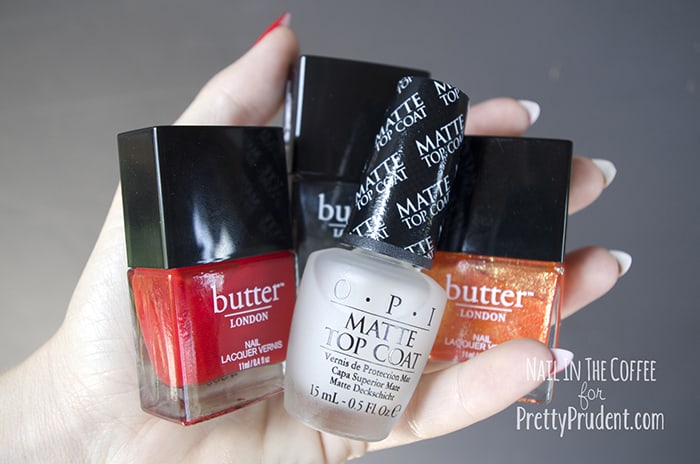
A whole handful! Butter London Chuffed for the base, Ladybird for the dots, and Chimney sweep for the outlines, and topped them all with the incredible OPI Matte Top Coat.
Happy Summer darlings!
Till soon,
Ally
Nailinthecoffee.com
Instagram & Twitter: @nailinthecoffee
So pretty! Can’t wait to do these myself!
I adore the leopard print and how she incorporates three different colors. The matte top coat is the perfect finishing touch. Her tutorials are always so detailed and easy to follow.