DIY Washable Pom Pom Pillow!


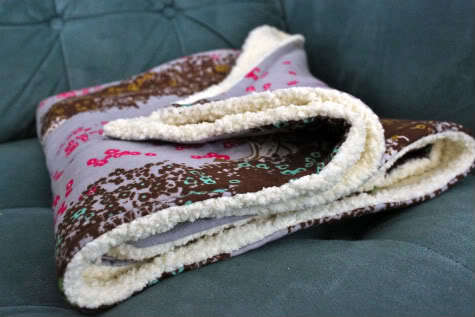
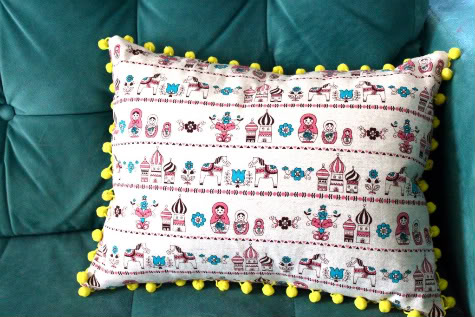
I love pom poms so much; they’re just cheerful! I had some leftover from the pom pom curtains so I decided to make a pillow for Scarlet’s rocking chair. This adorable pink matryoshka fabric paired with yellow pom poms matches the color scheme of her room. The key to this baby-friendly pillow is that I need to be able to clean anything Scarlet touches, so I made a pillow cover for an insert that’s been collecting dust in the closet rather then a straight up pillow.

Get the DIY Pom Pom Pillow Tutorial after the jump…

How to Sew a Pom Pom Pillow

1. Prewash, iron and cut your fabric. My pillow is 12″X16″ and I wanted a 1/2″ seam allowance on each side, so I cut the front piece 13″X17″:

Because I am making a pillow cover rather then a whole pillow I cut two pieces for the back, so I can create an opening to take the insert in and out. For my size pillow that means two 11″ X 13″ pieces of fabric.

2. Hem the edges of the two back pieces that will be visible by folding them under 1/2″ on the 11″ (shorter) sides, ironing and straight stitching in coordinating thread:

At this point I realized that I’d cut my back pieces of fabric with the pattern facing perpendicular to the front. That won’t look nice so I have to repeat the whole process with the pattern facing the right way. So pay attention to which direction your pattern is on each side.

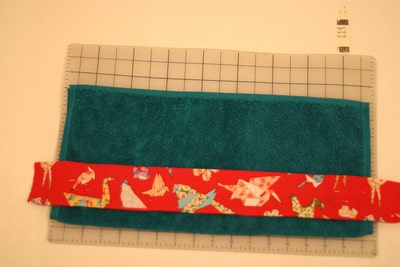
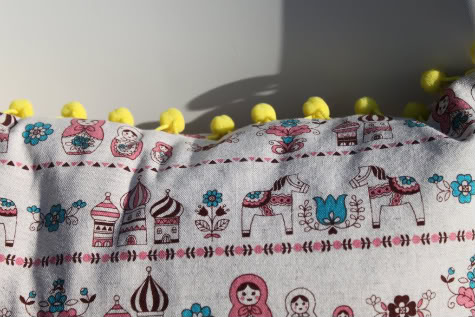
3. Lay your front piece right side up and pin your pom pom trim on top of it, edge of trim to edge of fabric, all the way around. The pom poms should be on the INSIDE.
Right way:

Wrong way (I did this project the wrong way so many times, enjoy learning from my mistakes):

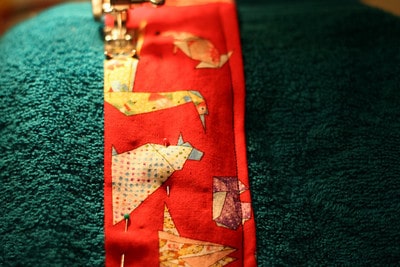
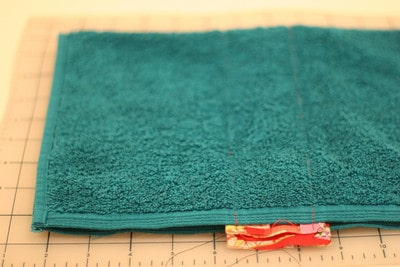
4. Sew the pom pom trim in place with a basting stitch (a straight stitch that is longer so not as tight), which keeps it together and makes it easier to sew the final pillow:

You might be tempted to skip this step and just pin and sew the whole pillow together at once, but with the pom pom trim I really recommend doing this first to get the best results, because later you can follow your basting line to ensure your pom poms are even on the final pillow.


5. Now it’s time to pin the two back pieces to the front, right sides facing, with the pom poms inside and sew in place. The hem that is going to show will be on the bottom piece. So pin that one first, then pin the other one next, overlapping the first. Follow the basting line that you made with a straight stitch. At the corners remember to leave your needle in the fabric, lift the presser foot, pivot the fabric, return the presser foot and sew to make a nice corner. I folded over the back piece to make an even nicer pocket. That’s a lie, I accidentally sewed one side like that and wanted to axe-chop my sewing machine but it ended up being fixable by folding it all over:

8. Snip each corner so they look sharp when you turn your pillow cover right side out:

9. Turn your pillow cover inside out and rejoice because after all that it looks awesome!

Marvel at your mad skillz that you got the pattern on the back to line up correctly:

10. Realize that the pillow insert you have is not 12″X16″ but actually 12″X21″. Wonder how you can possibly be a person who writes DIYs. Call Grandma and beg her to babysit so you can go to JoAnne’s and buy a pillow insert (and more pom poms).


11. Get the pillow insert, put your pillow in it, give it to a little girl, see her smile, resolve to make pillow cover for original 12″X21″ pillow insert still collecting dust in closet.

Prudent Price:
1/2 yard Japanese printed canvas from Hart’s fabric: $9
12″X16″ down pillow insert from West Elm: $12
1 yard Pom Pom trim from JoAnne Fabric: $2.99
Total: $24

by

DIY Magazine Gift Bow


If you love How about orange… as much as we do then you’ve probably already seen this awesome/fast/fabulous project. Well, I tried some last night and making these bows is totally addictive! Unfortunately I have a weird thing about cutting pages out of magazines so the only one I was willing to sacrifice was Glamour.

Just a tip: If you make a bow out of an ad for Brit’s new fragrance Circus Fantasythen your bow will smell like Circus Fantasy and that’s no good unless, of course, the gift is a bottle of Circus Fantasy in which case it’s perfect.

by

DIY Tray


This would be a great gift for a new mom. You could include a mug, a box of tea, a book, and a small journal and pen. This particular tray however, is going to make it’s home on my kitchen island ensuring that the giant pile of mail doesn’t slide off of the counter into the 2 day old glob of pureed carrots on the floor.

This is a quick project and its totally customizable! Have fun!

DIY after the jump…
What you need:
unfinished wooden tray (Michael’s $3.99)
Wood friendly paint
decorative paper (this was from Paper Source, they have lots of beauties.)
Mod Podge
paintbrush
x-acto, cutting mat & ruler

1. Paint your wooden tray your desired color, you can leave the inside (and the bottom, if you wish) unpainted. You will likely need 2 coats. Let dry.

2. Measure the inside of your tray. I did this by laying my decorative paper in the tray and pressing the paper into the opposite corner with my fingernail to make a crease. Very technical stuff.

3. Trim paper to size. As you can see here, my paper wasn’t quite wide enough so I used the piece that I trimmed from the bottom and added it to the width. It was still 1/4″ shy which is why I also added the 2 strips of lime paper.

4. Remove paper from tray and apply a coat of Mod Podge to the inside bottom of your tray. Make sure that the surface is entirely & evenly covered and work quickly.

5. Starting from one side, lay your paper in the tray, pressing and smoothing as you go.

6. Apply a second layer of Mod Podge over the paper.

7. You can stop here or you can add some fun elements. A cut out initial, photos, more pretty paper, or even fabric scraps! Just a note, most home printers have water soluble ink that will run, please test images first. Anything professionally printed, magazines etc. should be fine.

8. When you’re finished apply a final layer (or two) of Mod Podge to seal.

9. You may still have a few air bubbles, you can try to smooth these out but don’t worry, when it dries you will hardly notice them, especially if your paper has a pattern.

I had so much fun making this that I immediately bought more trays for other rooms. A nursing station for Quinn’s room, A book tray for Clare’s ottomen, and just something pretty for entertaining! If you would rather purchase a tray, I am partial to thesecustom beauties. Aren’t they gorgeous? I’ll have more trays to show you next week because seriously, I’m hooked on this fun project. If you make one too, send us pics!

by

DIY Hooded Baby Towel


A luxurious hooded baby towel is a great gift for an expecting or new mom. It’s big bang for your buck. Be sure to coordinate your towel to the nursery or family bathroom. If you’re feeling extra ambitious, present the gift in one of Jaime’s drawstring bags made from your accent fabric. 
DIY after the jump…
What you need:
A bath towel (approx 30″x54″)
A hand towel (approx 16″x27″) (not face cloth)
Accent fabric, an approximately 3.5″ x 18″ strip
Coordinating thread
Head pins
Sewing Machine
Iron

1. Wash and dry towels and accent fabric
2. Iron accent fabric
3. Fold, pin and iron a 1/2 inch seam allowance on both long sides of your accent fabric for a finished width of 2.5″

Tip: pinning through the outside of the fabric rather than the inside, shown incorrectly here, will ensure that you do not sew pins into your piece. Good to know.

4. Cut the edges off of your hand towel to 17″ length

5. Fold the hand towel the long way and position accent fabric strip evenly 1″ from the fold, pin in place through top layer of towel only

6. Unfold towel and sew trim to towel with 1/4″ seam along both lengths

7. Fold towel so that accent trim is folded in half on the inside as shown and sew down left and right side at inside edge of original towel seam

8. Invert piece to look like this…

9. Invert top left point into top right point to look like this…

10. Open piece to look like this (it’s the hood!)…

11. Fold Bath towel in half and place a pin at center edge.
12 Align top center edge of Bath Towel with back center seam of hood and pin an inside seam along entire back edge of hood (be sure to pin the vertical seam of hood open)

13.Sew seam

14. Now would be a really good time to make sure there are no random pins inside your hood. Last chance before we sew it up!

15. Fold inside bottom hood seam under, hiding all edges and trim inside and pin. The bulk of this seam should fall just below the back seam if the inside hood point is pushed all the way in, as it should be.
16. Sew. This is where a newer machine might get tired as the layers are quite thick here. You may need to skip over the corners and stitch these by hand later.

17. And you’re done!

18. Bathe baby, tuck baby in, drink wine.

by

Autumn Leaf Platter


This is a fun way to display your treats this season. Check out the DIY after the jump…

Use this template from Martha to cut out a selection of oak and maple leaves. I used a manila folder and some orange and gold origami paper.

Tip: Place your template on a window with your leaf paper on top (bottom side facing you) and trace. Then cut out leaf shapes.


Scatter your leaves on a unfinished wood plaque available at Michael’s or Walmart and arrange your treats!


So easy and festive!

by

Shortbread Cookie Recipe


It’s been chilly and rainy here. Perfect weather a cup of tea and shortbread cookies! These cookies are so delicious and easy to make and nothing beats the “wow” factor from the kiddies when they see yummy little treats in fun cookie-cutter shapes.

This is the recipe I’ve been using for years, passed on from my friend June…

June’s Shortbread

Pre-heat oven to 325.

Ingredients
2 cups sifted flour
1 cup butter
1/2 cup confectioners sugar (powdered)

Cream butter. Very gradually work in sugar… just a little at a time. Add flour and mix thoroughly.

Chill dough 30 minutes wrapped in plastic wrap.

Option 1: Roll dough out to 1/2 inch. Score with knife.
Option 2: Roll dough out to 3/4 inch (or pat down with hands) and cut with small cookie cutter.

Place cookies on an ungreased cookie sheet. Sprinkle granulated sugar on the cookies (or dip front of cookies in colored sugar, get creative!)

Bake for 5 minutes at 325. Turn down to 300 and bake for 15-30 minutes. They are done when you see even the tiniest hint of browning at the bottom. The next time you make them, take them out a minute before the tiniest hint of browning. The cookies should be ivory in color.

Store cookies in a tin. Separate layers with wax paper. In my experience, these ship very well.

Here is another recipe. It includes vanilla (I’m going to try that next time) and is a bit more detailed.

I’ll stop back later with a little DIY on the presentationbut for now I’m off to cuddle with sweet babies and a plate of cookies. heaven.

by

DIY Simple Snuggly Baby Blanket

Simple Snuggly Baby Blanket
Last week our 100 degree temperatures suddenly disappeared, and now it finally feels like fall.  Time to make Miss S a cozy blanket for snuggling…
DIY Baby Blanket
To get a custom feel without spending a bunch, use this DIY to make your bean his or her own stylish baby blanket. Use an adorable cotton fabric on one side, and compliment it with a cozy dose of snuggly softness on the other like fleece or minkee.  Here’s one I sent off to Miss Quinn (back before we knew she was a Miss!):
quinnblanket

Now you try!  Get the Simple Snuggly Baby Blanket DIY after the jump…


How to Sew a Simple Baby Blanket

1. Prewash, iron and cut your fabrics to your desired size, cotton for one side and minkee or something cozy on the other.  I had a yard of Echino Spring in Grey Lion so I started with that.  Lay your fabrics right-sides facing, smooth them nice and flat, then pin all the way around:

Then cut the excess fabric, leaving enough for a 3/4″ seam allowance:

2. Next you want to sew around the perimeter with a 3/4″ seam allowance, leaving a section open so you can turn your blanket inside out (depending on how thick your backing is you can decide how big your opening needs to be). I left my opening at the corner, but it’s easier if you leave it in the middle of one side:

Try not to sew your hair into the blanket, because nothing disgusts Jacinda more on earth then a stray hair:

3. Snip a square out of each corner.  This will allow you to get a nice flat corner when you turn your blanket inside out:

4. Turn your blanket and iron it flat, paying special attention to the edges to ensure your fabrics aren’t rolling onto the wrong side.  At the opening, fold the fabrics in, iron and pin in place:

5. Choose treads that coordinates or contrast, whatever your pleasure, and remember you can choose different colors for each side. Put your color for the cotton side in your spool and for the soft side in your bobbin.  With your cotton side on top, with a 5/8″ seam allowance sew a nice straight line all the way around your square.  Remember at the corners to leave the needle in the fabric, lift the presser foot, turn your fabric and put the presser foot back down to get a nice corner:

and just sew that opening closed:

I stopped there, but you could do it one or two more times around.  For added cuteness you can switch thread colors or use the same.  This time go another 1/4″ in (so 1/2″ seam allowance).

6. Snuggle!

by