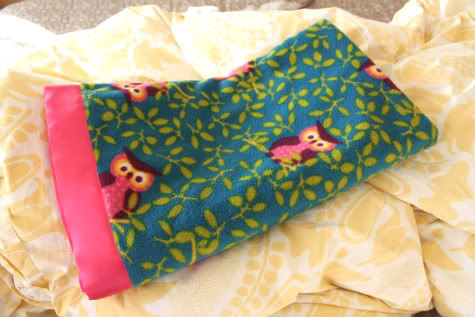
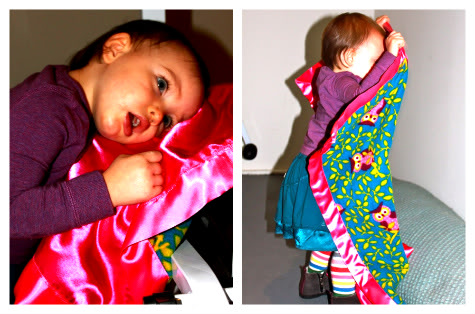
My daughter has one favorite blanket that she insists on sleeping with every night, but after two years it’s a little stained and run-down. What she seems to love about it is the soft coziness on one side and cool silkiness on the other. It was a fancy, generous gift (thanks Stella!) so instead of buying a new one, I was hoping to be able to replace it by making one myself. Did I succeed? Let’s see what Scarlet thinks… It’s a simple two sided blanket, but adding satin binding is a little tricky, learn how to sew a Silky Baby Blanket after the jump…
DIY Silky Baby Blanket with Mitered Corners
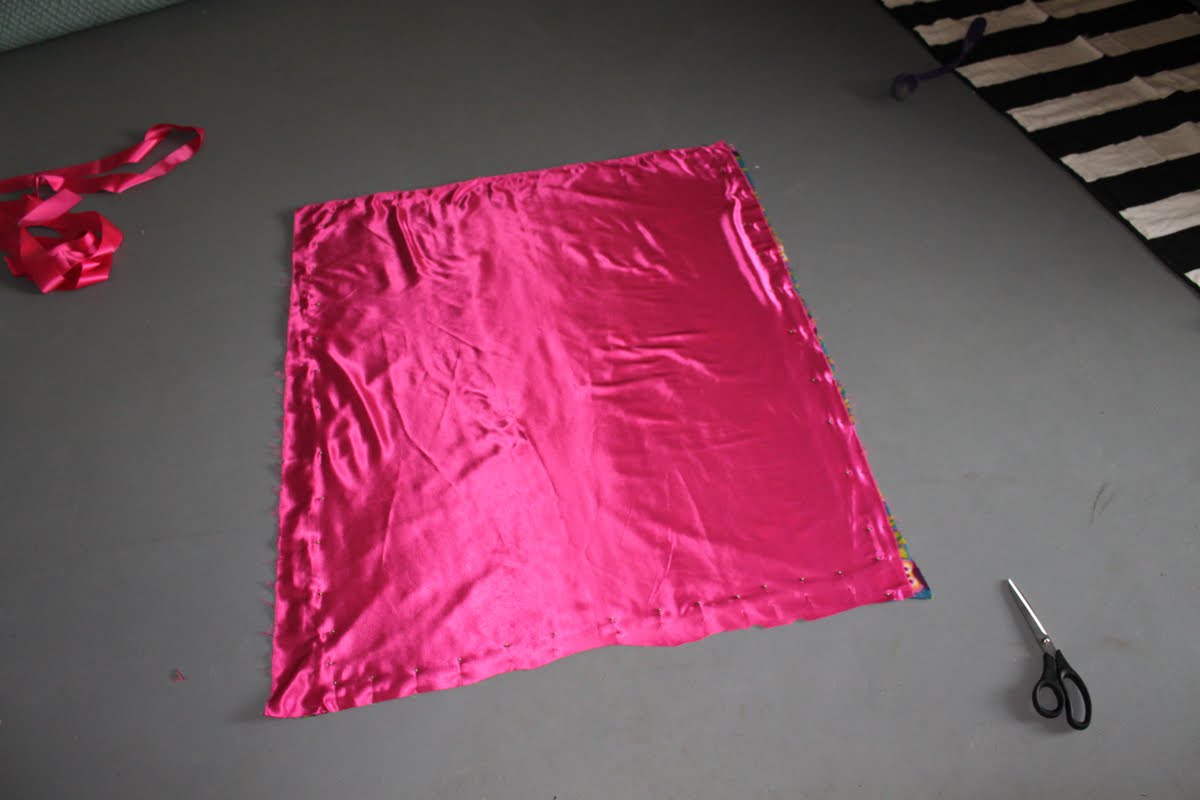
1. Pre-wash and cut your fabrics. I used a cute owl fleece I found at JoAnne’s and some pink poly-satin. I cut my blanket to 43″X36″ which is sort of random but it worked. Pin them together wrong-sides facing:
2. Sew all the way around with a straight stitch. At the corners leave your needle in the fabric, lift the presser foot, pivot your fabric and continue sewing:
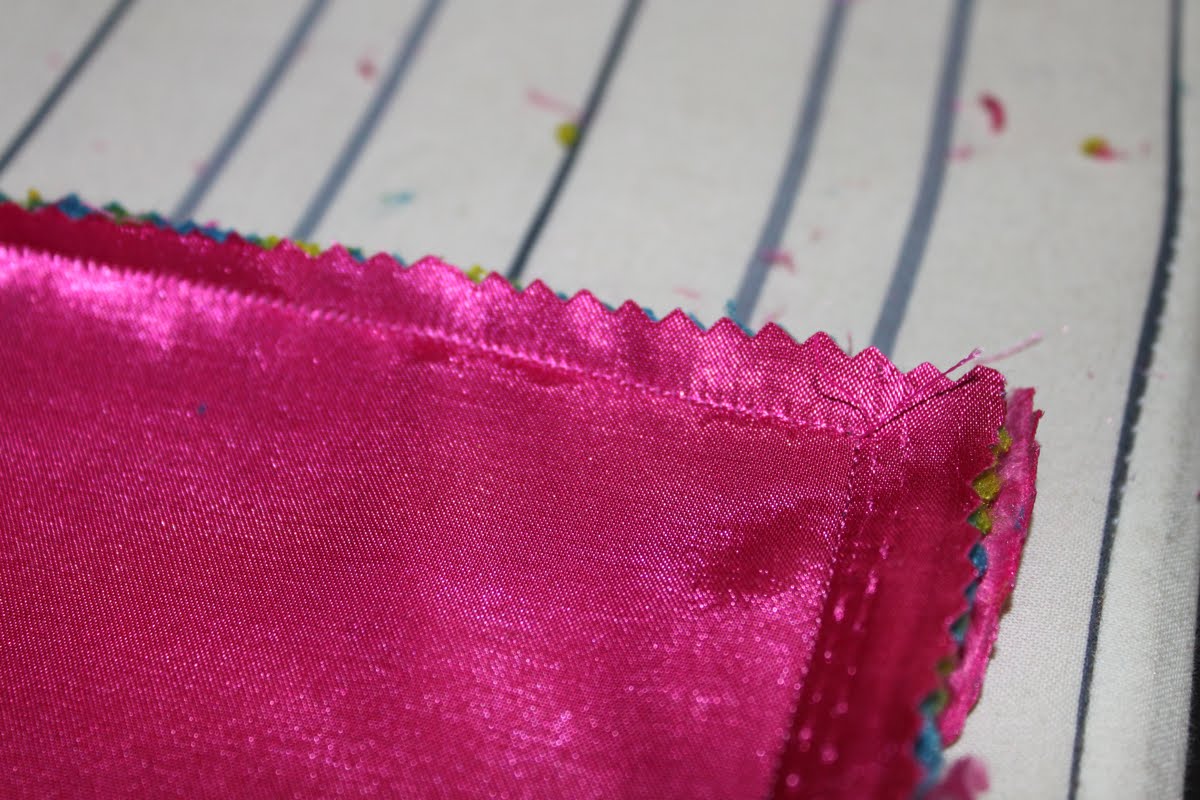
3. Serge your edges or cut with pinking shears:
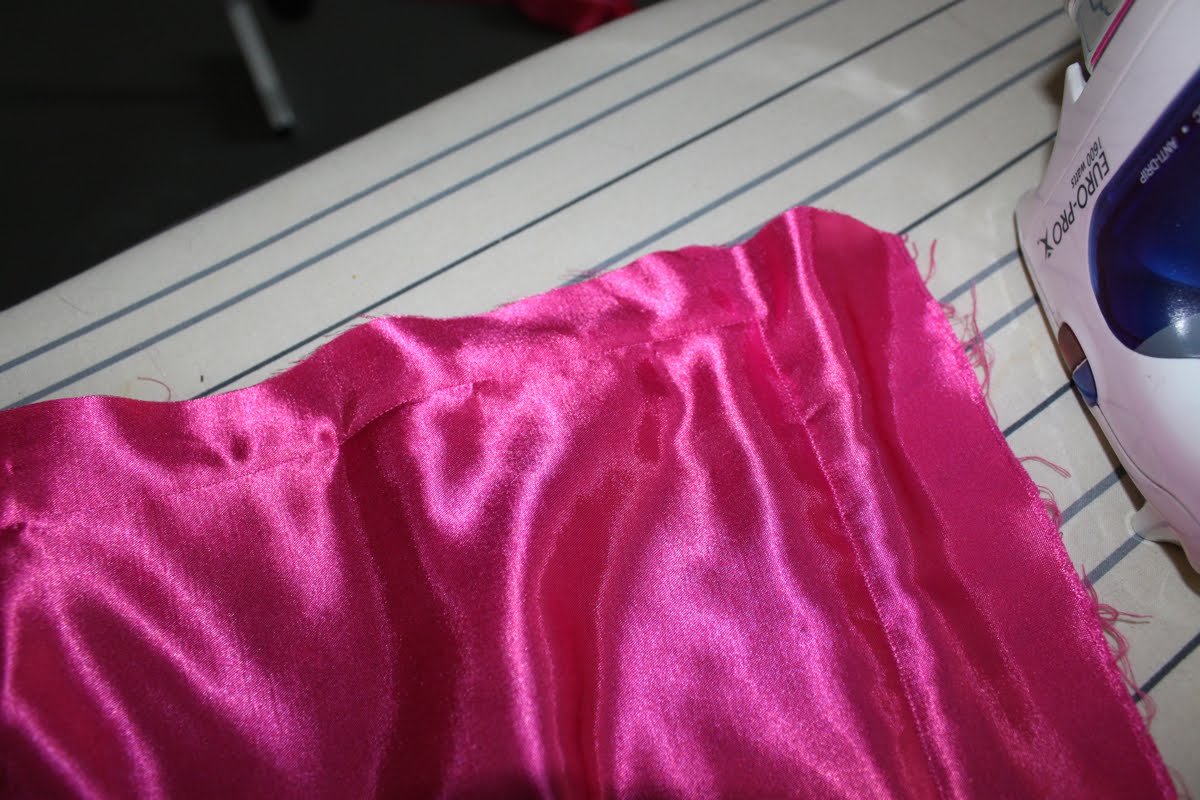
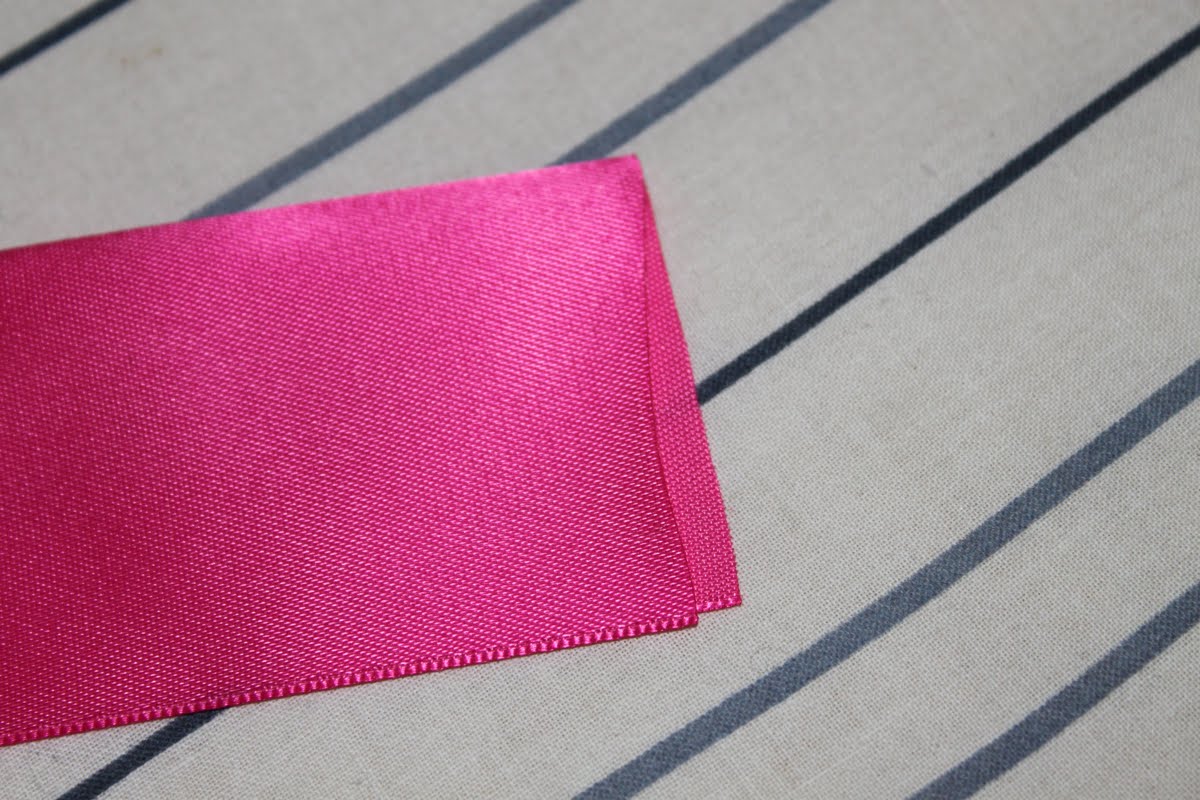
4. Now we want to attach our Satin Blanket Binding. First unfold it from the package and iron it so it’s nice and flat. Notice that one side is slightly shorter then the other. The short side is the one you want on top as you sew:
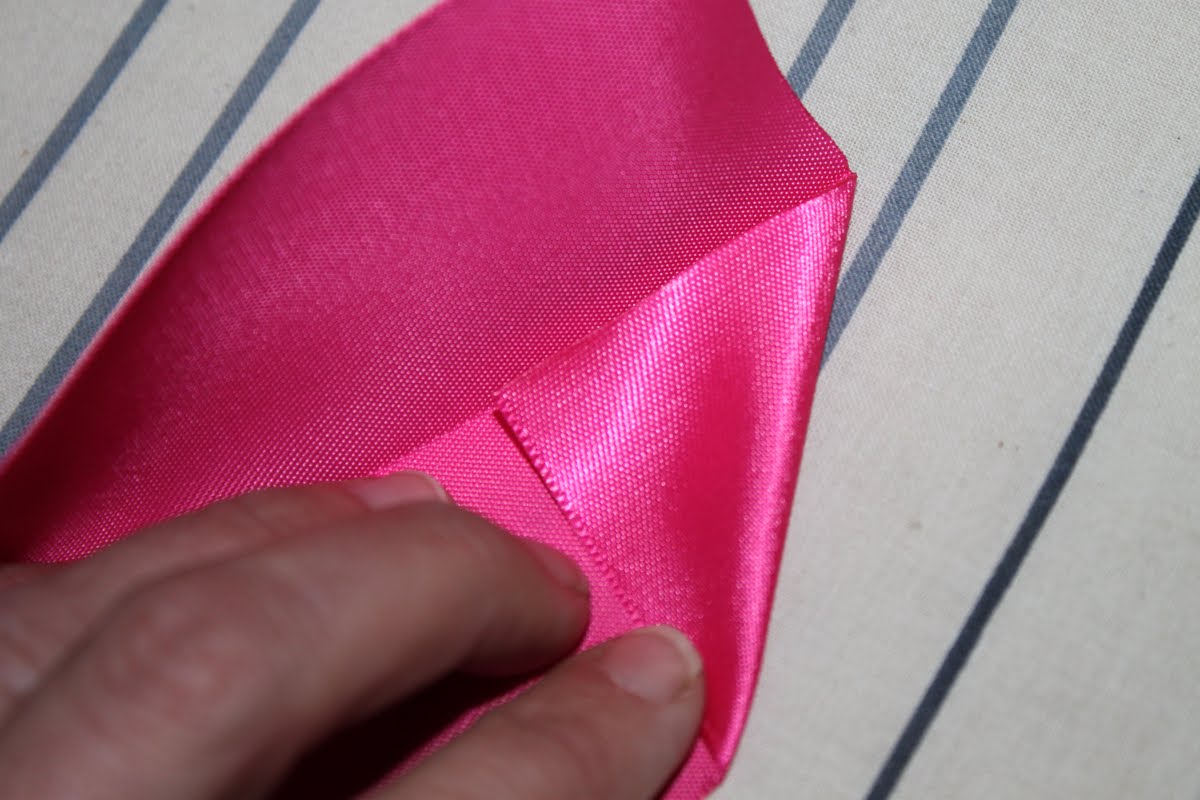
Then fold one side in (like you’re making a paper airplane):
Then the other so you have a nice point, and iron it:
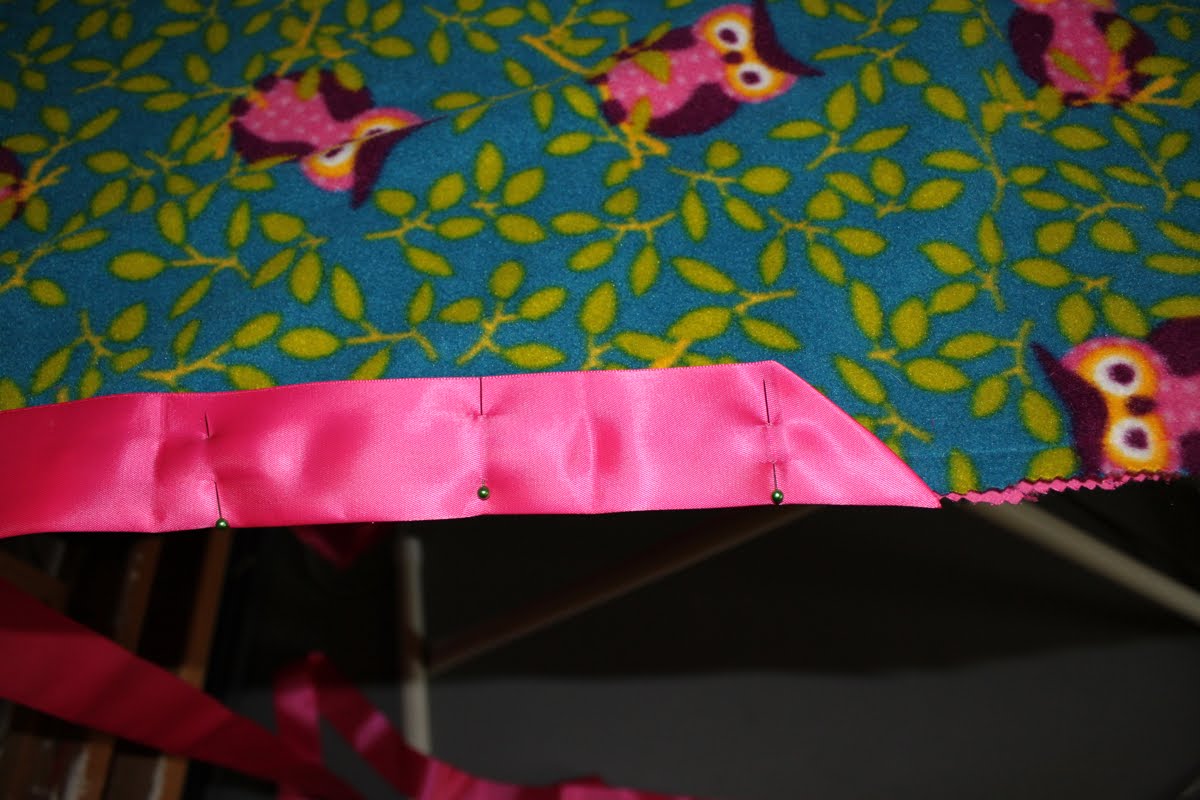
5. Now pin that to the middle of one side of your blanket, and pin the binding to the edge of that side:
Now don’t sew the triangle down, just sew the binding on at the base all the way to the corner with a zig zag stitch (2.5 stitch length and 3.5 width worked for me).
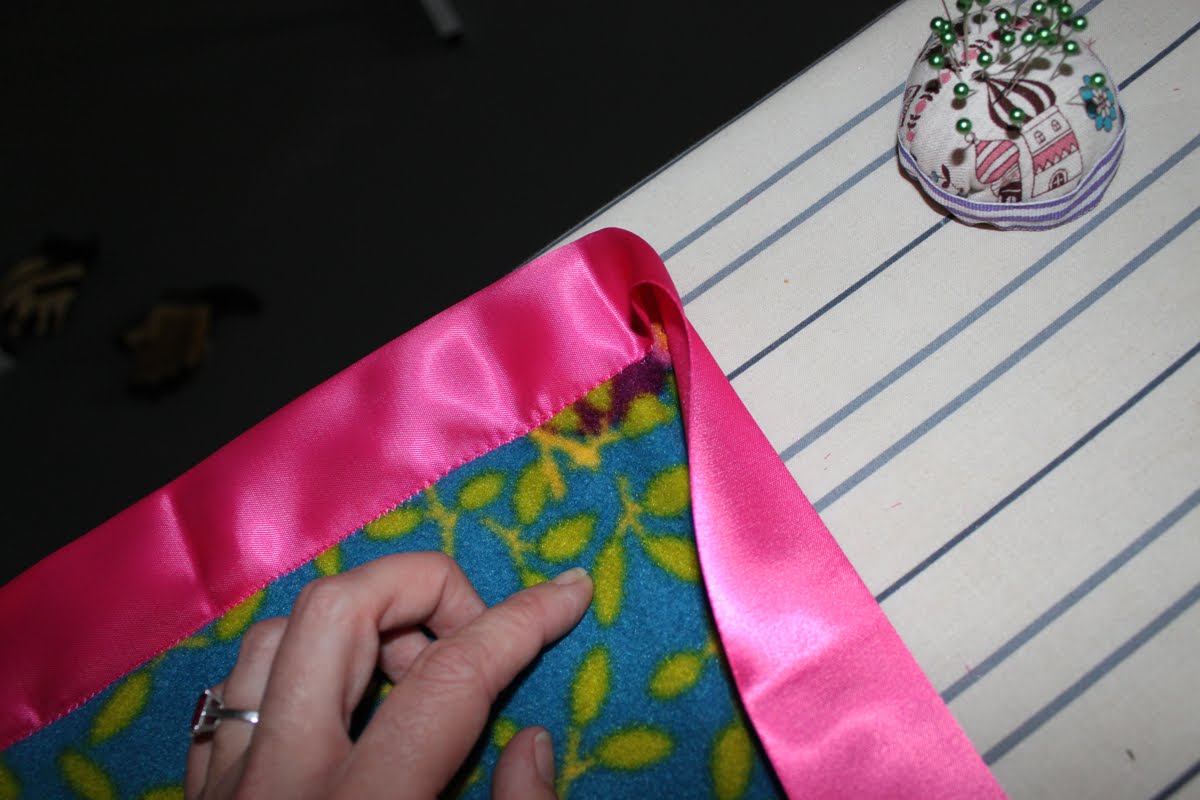
6. Now you want to make a mitered corner. Here’s how you do it. Open the binding up and turn the corner, laying one side under the blanket with your blanket to the edge. Sometimes it helps to pin the back of the binding to the blanket since it’s so silky it can slip.
Fold the binding back over the blanket:
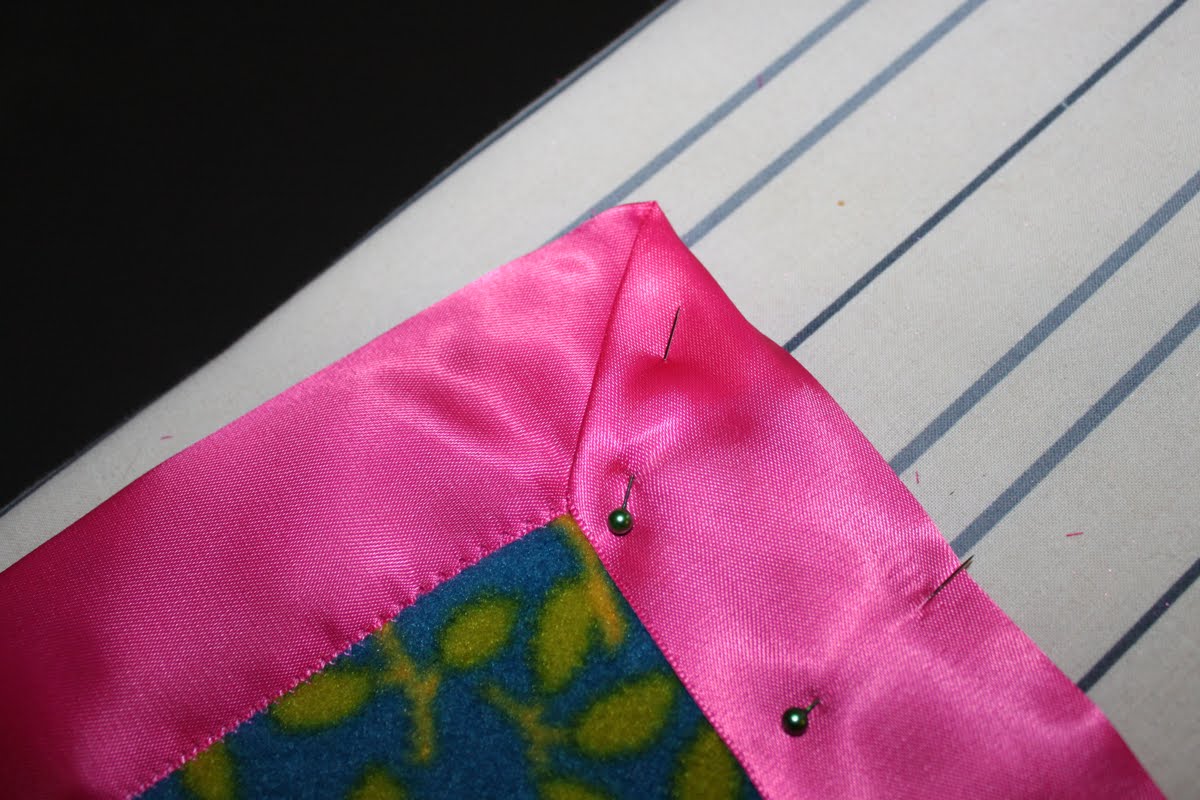
Create a nice sharp corner and pin in place. You want to be sure your corner lines up on both sides so you can catch it all with one row of stitches:
Sew the corner seam with a zig zag stitch. Then sew the binding onto the rest of that blanket side with a zig zag stitch. FYI, because you are sewing with the slightly shorter side on top you will catch the bottom of the binding as well. Just be careful as you pin to keep it centered and flat. Sew all the way to the edge again and repeat this step until you have sewed on all four sides. When you reach your starting point, cut your binding just long enough to slip under the original triangle you made and sew that down (i forget to take a picture sorry).
Hope and pray your daughter finds it as alluring as her favorite blanky. Rejoice when you realize she DOES! And it cost so much less then a store-bought version!
Hey! Sometimes I have a little trouble visualizing (even with a visual, ha!), but this tutorial helped me understand how to make a perfect baby blanket. I’m so inspired to make a blanket for my sister-in-law’s (well, soon to be, anyway) new baby girl, a project I was dragging my feet on before. I am a frequent visitor, first time commenter. So, thank you and keep ’em comin!
Love this tutorial! I am a very novice sewer and this was a great project. I used The Lorax and minky dot fabric “quilt style”… I’d love to share a pic. Is that possible? I’m new to blogs too! =]
Next time you buy the satin binding, make sure you use a Joann’s coupon! Its about $2.75!:) You don’t have to print the actual coupon out, just show them the email or the app on you smart phone! You could make some back up blankies for 1/2 that! Sorry, I just love coupons:0
Hi! i just made this folling your tutorial! i used snuggle flannel instead of fleece/minky b/c i wanted it to be lighter weight and fleece is too expensive. snuggle flannel was on sale for 2.99/yd and i used “costume satin” on sale also for 2.99/yd at Joann’s. I used a 50 percent off coupon from the Joann’s app on my phone and then my 10% discount student card. i got enough fabric to make 2 blankets(measuring 30×36 inches) for 18 dollars! Thanks so much for the tutorial. Question, when you are tucking the end of the binding under the triangle where you started do you have any suggestions to help it lay down better mine looks a tiny bit off b/c i had trouble tucking it in.
[…] Continue sewing the binding straight to the next edge and repeat the process for all four edges. One tutorial that really shows this process nicely is right here. […]
[…] about a year ago. I’ve been intending on making a blanket for Max, like the one in this Prudent Baby tutorial I’d found a couple years ago. I’ve made a few of these blankets before as gifts, but […]
Hey There. I found your weblog the use of msn. This is a really well written article. I’ll make sure to bookmark it and come back to learn extra of your useful information. Thank you for the post. I will definitely comeback.
[…] about a year ago. I’ve been intending on making a blanket for Max, like the one in this Prudent Baby tutorial I’d found a couple years ago. I’ve made a few of these blankets before as gifts, but […]
I have a question, i followed your tutorial, and it turned out great for a baby blanket, but what are some times for doing this project on a larger scale, either the fleece bunches or my silky fabric bunches. ): any help or advice would be wonderful!
I agree with Elizabeth, who commented just above me. I’m having trouble sewing a blanket like this for a friend (who was sewing it herself, but got stuck!) — yours is definitely the best overall tutorial for this that I have seen. Thank you so much!
HI, I’M A FIRST TIMER TO YOUR SIGHT AND I THINK IT’S GREAT. I HAVE BEEN PUTTING SATIN BINDING ON BLANKETS FOR MANY YEARS AND NEVER LIKED THE WAY ANY OF THEM TURNED OUT. i TRIED YOUR WAY TODAY AND IT WAS SO EASY TO DO AND LOOKS WONDERFUL. I AM NOT A NEW SEWER AND I’M ALMOST 80 YRS. OLD. SO YOU CAN TEACH AN OLD DOG NEW TRICKS. THANKS AGAIN
Some links may be affiliate links. Through Amazon Associates and other partnerships, we receive money if you buy something or take an action after clicking one of the links on our site.


This is adorable and inspiring, as always!
Love it!! Linked to your tutorial on Craft Gossip Sewing:
http://sewing.craftgossip.com/tutorial-soft-baby-blanket-with-silky-binding/2009/11/29/
–Anne
Thanks for your tutorial! It totally helped me with the binding 🙂
This looks perfect! I am going to try it for a baby gift!
Thank you for this tutorial. I just used it to make a blanket for my baby son – first time using quilt binding and it turned out pretty well. 🙂
Hey! Sometimes I have a little trouble visualizing (even with a visual, ha!), but this tutorial helped me understand how to make a perfect baby blanket. I’m so inspired to make a blanket for my sister-in-law’s (well, soon to be, anyway) new baby girl, a project I was dragging my feet on before. I am a frequent visitor, first time commenter. So, thank you and keep ’em comin!
Love this tutorial! I am a very novice sewer and this was a great project. I used The Lorax and minky dot fabric “quilt style”… I’d love to share a pic. Is that possible? I’m new to blogs too! =]
Next time you buy the satin binding, make sure you use a Joann’s coupon! Its about $2.75!:) You don’t have to print the actual coupon out, just show them the email or the app on you smart phone! You could make some back up blankies for 1/2 that! Sorry, I just love coupons:0
Hi! i just made this folling your tutorial! i used snuggle flannel instead of fleece/minky b/c i wanted it to be lighter weight and fleece is too expensive. snuggle flannel was on sale for 2.99/yd and i used “costume satin” on sale also for 2.99/yd at Joann’s. I used a 50 percent off coupon from the Joann’s app on my phone and then my 10% discount student card. i got enough fabric to make 2 blankets(measuring 30×36 inches) for 18 dollars! Thanks so much for the tutorial.
Question, when you are tucking the end of the binding under the triangle where you started do you have any suggestions to help it lay down better mine looks a tiny bit off b/c i had trouble tucking it in.
[…] Continue sewing the binding straight to the next edge and repeat the process for all four edges. One tutorial that really shows this process nicely is right here. […]
having the hardest time with this, my fleece stretches as I sew the satin and fleece together. Please help.
[…] about a year ago. I’ve been intending on making a blanket for Max, like the one in this Prudent Baby tutorial I’d found a couple years ago. I’ve made a few of these blankets before as gifts, but […]
Hey There. I found your weblog the use of msn. This is a really well written article.
I’ll make sure to bookmark it and come back to learn extra of your useful information. Thank you for the post. I will definitely comeback.
[…] about a year ago. I’ve been intending on making a blanket for Max, like the one in this Prudent Baby tutorial I’d found a couple years ago. I’ve made a few of these blankets before as gifts, but […]
I have a question, i followed your tutorial, and it turned out great for a baby blanket, but what are some times for doing this project on a larger scale, either the fleece bunches or my silky fabric bunches. ): any help or advice would be wonderful!
are you using a walking foot? for a larger project with these kinds of fabric it is a necessity
This is beautiful! I’m attempting to make blankets and a bed set for my first baby and your page has been very helpful.
Thank you for your clear-cut instructions. I looked at many sites and yours was the best one – clear,, and excellent images. Many thanks. Elizabeth
I agree with Elizabeth, who commented just above me. I’m having trouble sewing a blanket like this for a friend (who was sewing it herself, but got stuck!) — yours is definitely the best overall tutorial for this that I have seen. Thank you so much!
Thank you!!
HI, I’M A FIRST TIMER TO YOUR SIGHT AND I THINK IT’S GREAT. I HAVE BEEN PUTTING SATIN BINDING ON BLANKETS FOR MANY YEARS AND NEVER LIKED THE WAY ANY OF THEM TURNED OUT. i TRIED YOUR WAY TODAY AND IT WAS SO EASY TO DO AND LOOKS WONDERFUL. I AM NOT A NEW SEWER AND I’M ALMOST 80 YRS. OLD. SO YOU CAN TEACH AN OLD DOG NEW TRICKS.
THANKS AGAIN
Thank you so much for the step by step guide. Helped me immensely!