


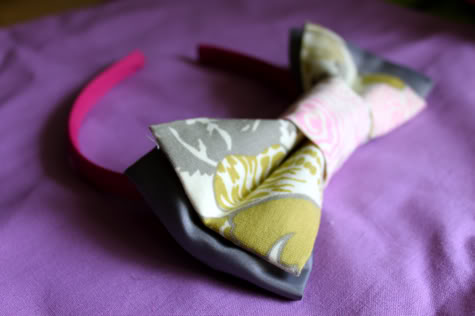
How cute are these??? I decided to make one of my own for little S. Get the DIY on how to make a Big Bow Headband after the jump…
(more…)
Inexpensive Party Decor Ideas
Last post on the Indian Elephant Party, promise. While you may not have this exact theme, you can definitely use these tips to create something similar, simple, and inexpensive for your party! 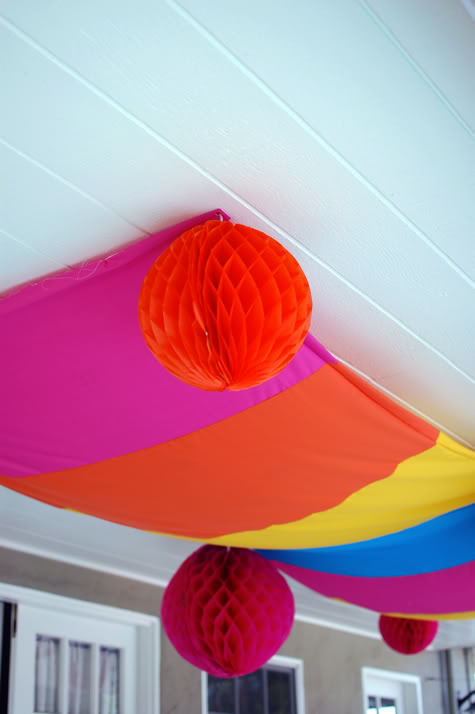
Get Cheap & Chic Party Decor Ideas after the jump…
(more…)
GIVEAWAY: $50 Gift Card to Madison Reece Designs!
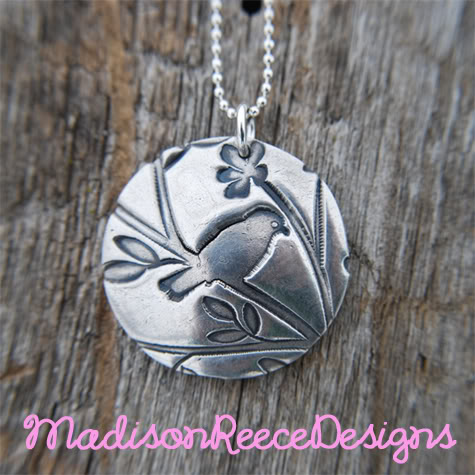
If you haven’t checked out the etsy shop of our awesome sponsor Madison Reece Designs, go go go! Her jewelry is absolutely GORG! Every piece is handmade to order and can be customized for you or your kiddos. This is my favorite. 
The designer of these beautiful treats, Melissa, says “I am a T-shirt & Jeans kind of girl, this is why I created this line. I know there are many other moms out there just like me. My designs can be casual or dressy. You will find in my silver clay designs that they are not perfect – they are meant to look very rustic and far from perfect. They have fine lines or marks in them that I think add character and uniqueness to each piece.” I totally agree. Her jewelry is super-wearable for everyday, but just special enough that you’ll get complimented on it constantly.
So how lucky are we? One reader is going to get a $50 gift card to order whatever they want from Madison Reece Designs shop! AND ALL OF OUR READERS are going to get FREE SHIPPING if they mention Prudent Baby when they order, woo hoo!
Here’s how to enter: Go check out the shop and pick your fav piece. Because you can customize this jewelry with your darling sons’ and daughters’ names, I want to hear what they are! Leave a comment telling us which piece you’d want to customize with your baby’s name and a little of the story behind the name itself. I’ll start: I totally love The Giving Tree necklace and want one with my daughter’s name: Scarlet Jane. Scarlet was a name my husband and I could agree on, and Jane is her Great Grandmother who is still around to love her. I see Jane in Scarlet Jane every day: in the way she walks, the way she laughs, and her constant repetition of the phrase “I can do it myself”, so I think it was just meant to be!
To win this contest, you must be a US Resident and you must be as gorgeous as this jewelry. Well, at least on the inside. Tweet, blog, or update your facebook status about the giveaway, and leave us another comment letting us know for extra entries. Come back every day for a new entry! Entries will close at midnight, Wednesday April 14th and a winner will be selected via random.org. And don’t forget to visit Melissa’s Shop Madison Reece Designs to get free shipping by mentioning Prudent Baby!
How to Make a Ribbon Necklace
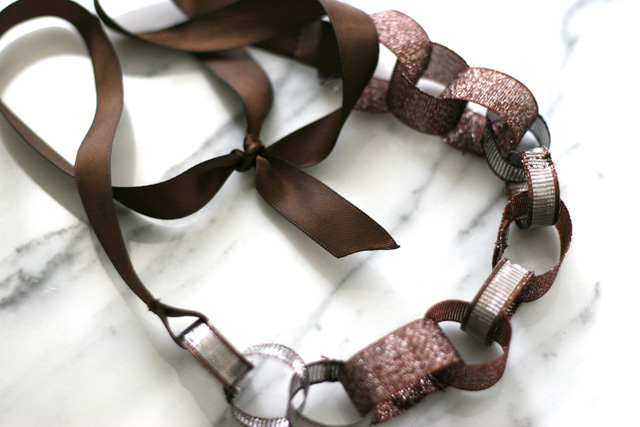
My crafty sister-in-law Elise has made a few of these beautiful ribbon necklaces for Clare, who just adores them. And I adore them so much that I’ve even considered stealing the brown one! Since I’m on my way out of town on a road trip to Austin, I asked her to share the details with all of us. Isn’t she nice? Find Elise’s DIY Ribbon Necklaces after the jump.
What you’ll need:

• Various ribbon. I picked up these sets of 6 from the dollar bin at Target. I used the solid ribbon (from Michael’s discount bin) for the ties.
• Sewing machine (I tried one of these hand-sewed, but it fell apart pretty rapidly. Not up to snuff for child-wearing. Maybe if you’re skills are much better than mine.)
• A lighter or candle (this part is optional, but I found that it really helps) Editors note: Use fire at your own risk and PLEASE PLEASE PLEASE be careful with open flames in a house with kiddos!
Note: the pictures are just basting stitches, since my machine is at the Bernina Store getting repaired.
What to do:
1. Cut your ribbon into stripes approx. 4 inches long. (You want to have plenty of maneuvering room.)
2. With right sides together, sew up and back. I used about a 1/4″ seam. My fingers got a little fumbly with anything smaller 🙂

3. Melt the ends of the ribbon in the candle or lighter. Before it completely cools, press the seam to one side, effectively sealing the ribbon. Turn your loop right-side-to.


4. Thread your next piece of ribbon through your loop, right sides together. Stitch, seal, flip.
Remember to link each new piece through your previous loop. The first time, I ended up with a bunch of unconnected loops because I wasn’t thinking. Oops!

5. Once you feel like your string of loops is long enough (I used all the ribbon), cut two lengths of your solid-color ribbon. Mine were about 18″, but it could be shorter or longer based on how long you want your necklace. You want enough length to tie a bow.
6. Seal off both ends of your ribbon with your candle.
7. Loop the ribbon through one end of your necklace and stitch. Repeat with the other length of ribbon on the other end of your necklace.

8. Tie ends in a pretty bow. Ta-da! You’re done.

Thanks Elise! I hope this doesn’t mean that you want us to make our own necklaces from here on out. HA!
25 Tips for Taking Great Photographs

I’m so lucky, I have FIVE amazing siblings! And you are so lucky because one of them, my big brother Bruce, is a professional nature photographer …oh, and a biologist, ecologist, professor, and a bunch of other awesome stuff (hi, i write a blog)… and he is sharing with us 25 Tips for Taking Great Photographs! Every person who takes pictures should read this list: It goes beyond the usual to teach you how your camera works, the basics of composition, and the thought process behind a great photograph.

And, if you are a travel junkie like the morrison-leventhal-curtis sibs, you’re in luck because Bruce is teaching a photography workshop/eco-vacation in Costa Rica this summer. It’s 9 days surrounded by beautiful wildlife in the forest AND on the coast. If it wasn’t for that pesky baby of mine I’d be there in a heartbeat. There’s still a few slots left and it’s super-affordable, you can learn more about the trip here. And visit these links to see more of my brother’s beautiful photographs of Africa, Costa Rica, and the amazing American Wilderness.

25 Tips for Taking Great Photographs after the jump…
25 Tips for Taking Great Photos
This list starts with some general thoughts on photography and gets into the nitty gritty. Stick with it and you will learn something.
1. It’s about the photographer, not the camera.
-The photographer picks the composition, defines the exposure, and decides the moment
-A good photographer will make art with a cheap camera; the same cannot be said for a bad photographer with expensive gear.

Image: Sequoia NP-Moro Rock Nikon D2H, Tamron 180 macro @ f9
2. There is always something to photograph
-Photograph your kids, your pets, a flower
-Be a tourist and photograph your town
-Photograph color or pattern

Image: Cesares Café- Wine and Coffee Canon 1Ds 200 f2.8 @f2.8
3. Decide to be a photographer
-You are more creative than you think, photography can unleash your inner artist
-Imitate the work you like to start
-You don’t have to follow the rules (even these rules), invent your style

Image: Prague-Hanging Around Canon 5D 24-105L @ f8

Image: Minnesota-Fall Canon 5D 50mm macro @ f14
4. Pre-visualize the image before you press the shutter
-Know what you want before taking the picture
-Know your camera and lens(es) and you will know what is possible
-Make a frame with your fingers and define your composition before you look through the camera

Image: Minnesota-Split Rock Winter Canon 5D 17-40L f16

Image: Olympic NP-Second Beach Nikon D100 50mm @ f22
5. Change your perspective
-Get low: Squat or lie on your belly
-Get high: Climb on a rock or chair
-Lay on your back and look up
-Your height shouldn’t define your perspective

Image: Minnesota-Jay Cook Fall Canon 20D 17-40L @ f16

Image: Redwood NP-Hurricane Trail Canon 20D 15mm fisheye @ f16
6. Turn your camera and shoot a vertical
-There’s no rule that says a landscape has to be horizontal and a portrait has to be vertical
-Fight your tendency to be linear and shoot a diagonal
-You are the artist… you make the rules
Image: Minnesota – Twins Canon 40D 70-200 f4L @ f11
TECH TIPS
7. The aperture you choose will define the mood you convey
-Know what the aperture is and what it does (see below)
-The aperture is like your pupil, it regulates the amount of light passing through the lens
-A wide aperture (small number) isolates your subject
-A small aperture (large number) increases your range of focus (aka: depth of field)
-Use your aperture to define your image
Image: Tanzania – Serengeti Lioness Canon 30D 120-300 f2.8 + 1.4x converter @ f4
8. The shutter speed you choose will define the mood you convey
-Know what the shutter does (see below)
-The shutter determines how long the sensor or film will be exposed to light.
-A fast shutter speed (high number) stops action
-A slow shutter speed (small number) blurs motion
-Use your shutter speed to define your image

Image: Costa Rica – Savegre River Canon 5D 17-40L Shutter .5 seconds @ f16
9. Learn exposure theory and become a creative photographer
-There is no one correct exposure, but exposure will impact the mood of your image
-The shutter speed you choose must be balanced by the aperture you use
-The contrast is true as well… the aperture you choose must be balanced by the shutter speed you choose
-Set the camera to “program” and the camera makes the decision. When you learn to choose an aperture and shutter speed you become a photographer.

Image: Arizona – Sedona Rainbow Leica CL 40mm @ f11
10. Use a tripod
-A tripod will slow you down, but working slowly gives you time to think and plan your composition
-A tripod allows you to use a slow shutter speed.
-With a tripod you can blur action without inducing “camera shake”
Image: Puerto Rico – Tripod in El Yunque Nikon D100 12-24 f4DX @ f16

Image: Venice – Gondolas at Night Canon 5D 24-105L @ f8
COMPOSITION TIPS
11. Know your subject
-Take the time to understand your subject
-Learn how time of day and time of year influences your subject’s appearance or behavior
-Shoot the same thing in a different way

Image: Minnesota – The Tree Winter Canon 5D 100mm @ f11

Image: Minnesota – The Tree Summer Canon 50D 70-200L @ f10
12. Be the Zen photographer
-Simplify your composition
-Isolate your subject
-Reduce tension by reducing distractions

Image: Minnesota-Reflections Canon 20D 300mm @ f8
13. The center is no place for a face
-Your subject is lost in the middle, as the human brain searches for interest around it
-Imagine that your picture is a window, divide this window into 3 rows and 3 columns
-Place your subject in the upper left, upper right, lower left, or lower right
-Your point of interest, like the eyes of a child, should be where a row and column intersect
-This is the “Rule of Thirds”

Image: Costa Rica – Beached with a horse Canon 40D 300 f2.8 @ f13
14. Make your birds fly into the picture
-Provide negative space for your movers to move
-The human brain perceives what happens next
-People walking out of pictures will cause your audience to follow the movement
-If you show a biker with a place to go, your audience will be engaged with the image

Image: Tanzania – Flying Cranes Canon 1DII 300 f2.8L IS + 1.4x @ f5.6
15. Use converging lines
-Brains like to take a walk, give a brain a path to follow

Image: Wisconsin Road-Canon 40D 17-85 @ f9

Image: Costa Rica – Lost on Baru 5D 17-40L @ f16
16. Compose with color
-We are primates and primates seek color
-Bold colors can an be a focal point that engages a viewer

Image: Minnesota – Fall Mix Canon 1DIII 300mm @ f5.6

Image: Minnesota – Fall Abstract 1DIII 300mm @ f2.8
17. Make your image monochrome
-Monochromes are black and white, sepia, duo-tones, or color images that appear to lack color.
-Our brains seek a pattern
-Use monochrome imagery to create a pattern or a point of focus and you will engage your viewer

Image: Minnesota – Lift Bridge Morning Canon 1DsII 17-40L @ f14

Image: Tanzania – Black and White Family Canon 1DII 300 f2.8L + 1.4x Converter @ f4.5
18. Be an abstract artist
-Not all photographs need a definite subject
-Experiment with unfocused images, it worked for Monet
-Play with light, color and patterns

Image: Wabasha-Ice Dunes Nikon D1x 300AFS + 1.4x converter @ f25

Image: Taylors Falls State Park – Nikon D100 180 Macro @ f10
19. Rules are meant to be broken
-Sometimes a centered composition works
-High-key images are overexposed, so what!
-A person leaving the picture tells a story too
-Break the rules and you may be pleasantly surprised

Image: Minnesota-Snow Storm Canon 20D 400 f5.6L @ 5.6

Image: Minnesota-Impaired Vision Canon 1Ds 300 f2.8HSM @ f2.8
TECH TIPS: LIGHT
20. Photography… it’s about the light!
-Photo + Graphy = Light Picture
-Shoot in the morning or the evening when the light is warm
-Warm light softens your subject and is easy on the eyes
-Midday light makes for harsh shadows and too much contrast

Image: South Dakota – Morning Bison Canon 40D 120-300 f2.8 @ f2.8

Image: Italy – Venetian Morning Canon 5D 24-105L @ f16
21. Front lighting enhances your subject
-Front light makes eyes sparkle and fills the shadows
-For front lighting, shoot with the sun to your back
-For front lighting, add a flash

Image: Minnesota – Black Eye Morning Nikon D100 300 f2.8 @ 2.8

Wisconsin – Snowy Hunt of the Hawk Owl Canon 7D + 300 f2.8 @ f4.0
22. Backlight your subject to create an impact
-Backlight makes silhouettes
-Backlight translucent subjects to show-off detail
-Backlight to increase to make an image dramatic

Image: Minnesota – Spring Ephemeral Nikon D2h 300 f2.8 @ f2.8
23. Use a flash, but…
-A direct flash can cause unflattering shadows and make your images cold.
-Crumple white or colored filter paper and use a rubber band to attach it to your flash.
-Shoot through the filter paper to soften light.
-If you can, aim your flash at the ceiling to “bounce the light.” Bounced light can soften your subject.

Image: Costa Rica – Coati Mundi Canon 40D 300 f2.8 @ 2.8 w/ Flash + Diffuser
24. Experiment with your photography software!

Image: Black-eyed Susan collage Photoshop Manipulation
And lastly,
25. Carry a camera…
-Serendipity happens… be there for it

Image: Minnesota – Spring Doe Canon 20D 300 f2.8HSM @ f 2.8
Learn about photography and soak up some delicious images on Bruce’s blog at BTLeventhal.com. And let us know what you think about these tips, and any tips you have, in the comments!
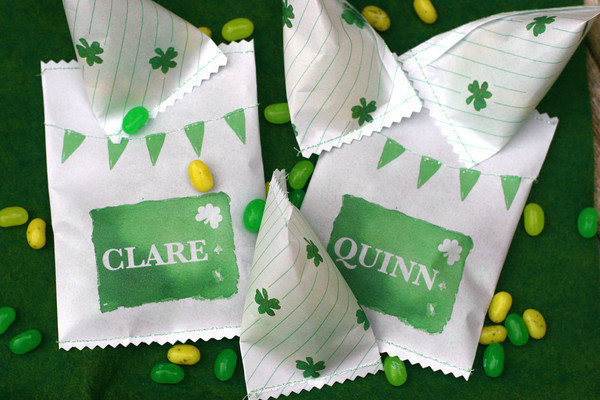
How to Assemble Party Favor Bags

One of my favorite parts of throwing a kid’s party is putting together the favor bags! Of course this one featured elephants galore, but you can use the same DIY to create a custom gift bag for your party. This DIY will show you how to turn a boring cello bag into a stand-up favor gift the kids will love. After the jump I’ll show you How to Assemble Favor Bags using paper and ribbon!
(more…)
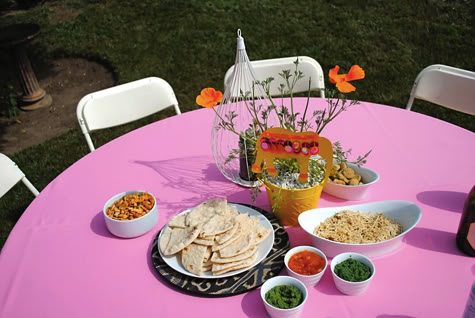
Indian Elephant Party Food!

It’s the little details that make any party theme extra fun. 
Find out the inexpensive foodie things we did to make our little Indian Elephant soiree extra special (and who made those cutie cupcakes) after the jump…
(more…)
How to Make Custom Crayons
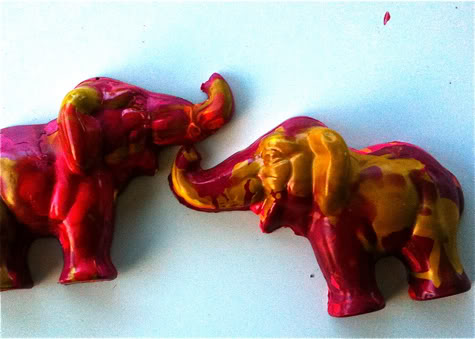
For Scarlet’s Indian Elephant Party I made some custom shaped crayons as favors. It’s super easy and fun, give it a shot for your next party! Only make them smaller then these, trust me.
I’ll give you the full DIY on How to Make Crayons, as well as how to peel crayons without driving yourself insane, after the jump…
(more…)